Sunday 1 September 2013

A few gifts and small makes - Make up bags

Here are some small makes that I have done recently. Some are for me and some are gifts for other people.

Make up bags

This is a make up bag which is from Cath Kidson's book 'Sew!' I have made three of these so far. The first one was a present for my Mum, for her birthday last year. She really likes it and says it quite tall so you can fit a lot of toiletries in it. It is made from a Moda fabric which is a William Morris style pattern. The lining is a mottled red called Marbles, also Moda. I used this pattern in green for the binding on my hexagon quilt. I was pleased that I got the zip right on this the first time.


Finished make-up bag


Inside - you can just see the zip edge and fabric
Topstitching on the zip

 The next one was a hen party present for my cousin. This was made from Joel Dewberry’s Notting Hill collection. I find it interesting that I am drawn to the same designers even when I don’t know who has designed a fabric. I saw this in the shop and the idea came to me that this would be perfect for her.
With this one, I managed to work out a way of cutting the outer fabric so that I could use just one fat quarter. This can only be done however if you are using a geometric print or one without an orientation which can be seen as up side down.
I really love the colours of this one.
 
Laying out the fabric for cutting

Pining the zip on

Finished bag

I then made one for me so I am not left out! I have been using a very small make up bag from M&S, but it has got a bit tatty and it was too small for my foundation brush to fit in it. I have it sat on the top of the toilet in the bathroom as it is right next to the sink and the mirror.
I like the fabric I chose, it is quite grey and neutral, but has a bit of colour with the small birds in it. It will be useful to keep my make up in at home, but also my other toiletries for when I go away. As this pattern is only one way up and I just had a fat quarter of this pattern I shrank the size down a bit to fit in. I think maybe I could have made it a bit shorter though. I also changed the way I sewed the zip so it was neater on the inside. In the original instructions you can see the zip piece on the inside and the edge of the lining is exposed. I cut it with pinking shears to reduce the fraying, but for my one I managed to sew the zip so the edges are all enclosed. I think it makes a much neater finish and makes it more durable and less amateur looking.
I haven’t yet sewed the tabs on the ends, but I wanted to take a picture to show with the other versions.

My make-up bag

Inside lining - I have folded the edges inside to make it neater

All of them have been lined with a cotton or polycotton, the book suggested a shower curtain fabric and I like this idea so it is washable for it having make up and toiletries in it. However I didn’t have any.
I will probably make more of these over time as they are a very quick pattern to make. The instructions in the book are clear and easy to follow.

Thursday 11 July 2013

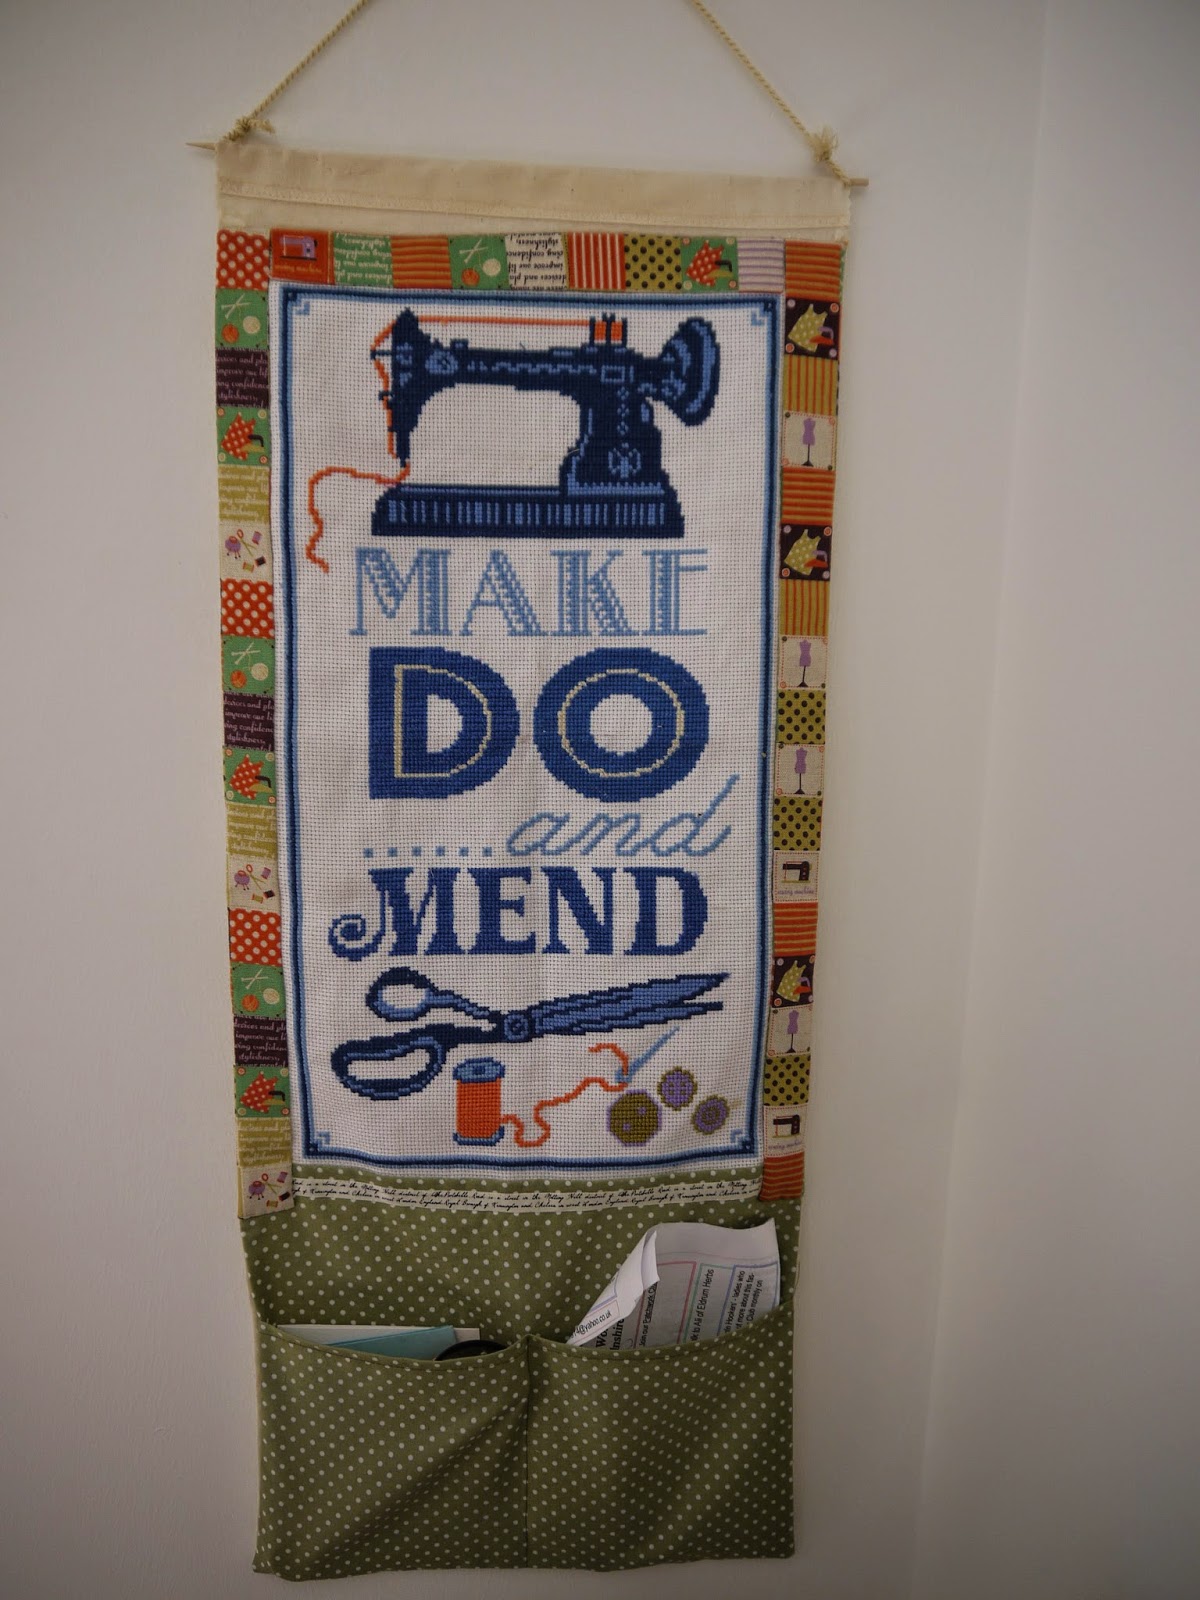
Cross stitch wall hanging


A while ago I started a cross stitch project. I don’t do cross stitch very often but it makes a nice change. I actually started this project on holiday in Italy last summer. It was beautiful weather and lovely to sit by the swimming pool in our villa doing some sewing.

 
Swimming pool in Itlay


Sunflower field next to the villa
The pattern is from Cross Stitcher number 252 May 2012. My mum buys this magazine as she does a lot of cross stitching. I like this magazine as they have a very good range of projects rather than just cards. They also have some modern designs and very pretty things, they have a good mix of appealing and different styles. There is also just enough in there in addition to patterns such as interviews etc.


I had originally planned to do it in a red white and blue theme, probably because that was a popular theme last year. I was also planning on hanging it on my bedroom door and add some colour to my room.


I used 14 count aida and DMC threads, and I did the sewing in an embroidery hoop. I stitched some gridlines to help me keep track of the pattern.

A work in progress


I did most of the blue parts and then started to sew the bobbins at the bottom and the thread in the machine at the top in a bright read. However I had since moved house and thought that I wanted it to match with my sewing machine cover and fit in with the style of the room better. I unpicked the red and added in some orange, purple and green.
Wall hanging

Close up of design


I sewed up the cross stitch onto a calico backing and added in the pockets with some ribbon it disguise the join. I used a wooden barbeque skewer to keep it flat against the wall.

I am pleased with this, it took a lot of time but I think it looks good next to my desk. I also keep my sewing essentials in there such as tailors chalk, unpicker and the top bobbin holder for my machine.

Monday 27 May 2013

Star and Elephant Quilt


This is a quilt I started for my sister in September, unfortunately I didn’t finish it as soon as I would have liked to but quite a few events got in the way. I have now finished with it and feel I learnt a lot working on this quilt as it is the first quilt I have made by machine.

In a previous post I discussed how I chose the fabrics for this quilt, if you wanted to read it.


I was following a pattern in a book called Love....quilting. This was ok, but it did leave out quite a few key instructions and I felt that the instructions were not very clear. Also it would have been good to have close up photos and one of the back of the quilt, you can never have too many photos in a project book.


Piecing

I worked on it step by step, so I cut out all of pieces first and then started to sew the blocks.

The stars are a Sawtooth star and this is started by making flying geese blocks, I had to look up how to make the parts online and found a useful and quick method. It did mean there was a bit of waste with all of the small triangles cut out, but I’m sure I will use them for something else.

Blocks ready to stitch together
Flying Geese

One almost finished block

Once I had made the star blocks I then sewed on the grey borders and started to plan the quilt layout. As I had 5 blocks with the blue star fabric on the stars and seven with the plain blue, I decided to have a blue star block in each corner and one on the front of the quillow.

Quilt top

Next I cut the large squares in the Washi fabric to go between the star blocks. I don’t think I had cut this as accurately as I should have as later on I had some difficulty getting all the blocks to match up in size, later this affected the quilting. As I needed to cut diamond shapes, this meant I had to cut the fabric on the bias which meant it was stretchier to sew.

Once I finished all the blocks I used a bright pink fabric as the border. In the book they used 2 borders even though they did not tell you what size to cut them to. I only used one border as I was running out of time and felt the quilt was a good size.

I used some wadding off the roll which was bought from a local shop. For the backing I used an Egyptian cotton sheet, which was left over from the backing on my hexagon quilt.

Planning the layout of the blocks - not quite enough floor space!


Quilting

I had a lot of problems with the quilting. I couldn’t seem to get it started right and I was left with lots of creases and bumps. I must have taken the quilt apart about 3 times and re basted it each time, but still the back looked terrible. Also I was laying it out on my dining room floor and there wasn’t enough space to get it completely flat. I looked online and someone mentioned that I should be using a walking foot.

Once I started to use the walking foot it seemed better but I still had the odd crease and fold. As I had started the quilting about 4 times by now, I did just want to get it finished and not mess around anymore.

It took some of practise to ensure I was stitching in the ditch on the top side and that the lines were straight and attractive as possible on the back. This problem goes back to not cutting the fabric out accurately at the start.


Quillow

For the quillow pocket part I made up one block and did a pink border for it, I then put some wadding behind it with some white fabric and quilted the pattern.

Binding

I used a yellow fabric for the binding as I felt there was enough blue and pink already and knew my sister would like it nice and bright (if it was for me I probably wouldn’t have chose yellow next to the pink.) While sewing the binding I also attached the pocket which went well. I then stitched up the sides of the pocket and binding by hand.


Finished quilt

Close up of the front
The quilt back with pocket in the middle at the bottom edge
I was quite nervous to first fold it away in case something had gone wrong, but luckily the quilt fitted in fine and was easy to get out again. Once again I looked up online how to fold a quillow.


All folded away


It was then posted off to Wales to my sister and she was delighted with it. Surprisingly she knew straightaway how to fold it so I didn’t need to show her!


Reading back over this, it sounds like I didn’t enjoy it or that there were constant problems. I enjoyed this overall but learnt some very difficult lessons. Halfway through working on this I was given a quilt ruler for my birthday and this has made all the difference to the cutting of things I have made since.

I am pleased with this quilt as it is the first one I have done all on the machine and I learnt a lot of new techniques and skills which will make my future projects better.

You can see quite a few of the quilting lines on the front, more than I am happy with, however I guess you are not going to be perfect straightaway.

I do like the quillow idea and will be using it again.